#iphone dns
Explore tagged Tumblr posts
Visit Tumblr Blog
Explore Tumblr blogs with no restrictions, modern design and the best experience.
Last Seen Tumblr Blogs


Fun Fact
Tumblr was the first site to host the blog for President Barack Obama in 2011.
Text

Back at it for another year of wallpapers....
January variant of my calendar wallpaper series is now available. Downloads available in Desktop 4K (with and without dates), Ultra widescreen, Tablet and Mobile sizes - https://www.kriegs.net/2024/12/january-2025/
#wallpaper#desktop wallpaper#photography#iphone wallpaper#android wallpaper#ipad wallpaper#calendar wallpaper#calendar#sony a7iv#Sigma 24-70mm DG DN II#download#4k widescreen#4k wallpaper
2 notes
·
View notes
Text
Blocking Ads on Mobile Devices
Blocking ads on our phones is way harder than it should be so I figured I'd make some recommendations. These are not the only options out there, just the ones that I know and have used.
Please note that browser-level and system-level adblocking are complementary; you'll have the best experience if you use both of them together as they each block different things in different places. If you want a basic idea of how effective your combined adblocking setup is, you can visit this website in your mobile browser.
Lastly, there is some additional advice/info under the readmore if you're curious (EDIT: updated March 2025 to add more adblocking options for iOS and to add info about sideloading altered versions of social media apps that don't contain ads on Android and iOS).
Android
Browser-Level
uBlock Origin (for Firefox)
System-Level (works in all apps, not just browsers)
AdGuard
Blokada 5 (completely free version) OR Blokada 6 (has some newer features but they require a subscription)
iPhone/iPad
Browser-Level
AdGuard (Safari extension; free for basic browser-level blocking, requires a subscription or one time purchase of “lifetime” license for custom filters)
1Blocker (Safari extension from an indie developer; can enable one built-in or custom filter list for free, requires a subscription or one time purchase of “lifetime” license for enabling multiple filter lists and updating filter lists to the latest version automatically)
Wipr 2 (one time purchase from indie developer; simplest option to use, but also the least configurable. Best if you are looking for one time set and forget and don’t need any custom filters. Note that it does not have a system-level blocking option)
System-Level (works in all apps, not just browsers)
AdGuard (requires subscription or one time purchase of “lifetime” license for system-level blocking)
1Blocker (can activate without a subscription, but requires subscription or one time purchase of “lifetime” license to enable system-level blocking AND browser-level blocking simultaneously)
AdGuard DNS only (this is free and does not require the AdGuard app, BUT I would only recommend it for advanced users, as you can't easily turn it off like you can with the app. Credit to this Reddit thread for the DNS profile)
Some additional info: browser-level blocking is a browser addon or extension, like you might be used to from a desktop computer. This inspects the HTML code returned by websites and searches for patterns that identify the presence of an ad or other annoyance (popup videos, cookie agreements, etc.). System-level blocking is almost always DNS-based. Basically whenever an app asks your phone's OS to make a connection to a website that is known for serving ads, the system-level blocker replies "sorry, I don't know her 🤷♂️💅" and the ad doesn't get downloaded. This works in most places, not just a browser, but be warned that it might make your battery drain a little faster depending on the app/setup.
Each of those types of blocking has strengths and weaknesses. System-level DNS blocking blocks ads in all apps, but companies that own advertising networks AND the websites those ads are served on can combine their services into the same domain to render DNS blocking useless; you can’t block ads served by Facebook/Meta domains without also blocking all of Facebook and Instagram as well because they made sure their ads are served from the same domain as all the user posts you actually want to see. Similarly, browser-level blocking can recognize ads by appearance and content, regardless of what domain they’re served from, so it can block them on Instagram and Facebook. However, it needs to be able to inspect the content being loaded in order to look for ads, and there’s no way to do that in non-browser apps. That’s why using both together will get you the best results.
These limitations do mean that you can’t block ads in the Facebook or Instagram apps, unfortunately, only in the website versions of them visited in your browser. It also means ads served by meta’s/facebook’s ad network in other apps can’t be blocked either (unless you're one of the rare beasts who doesn't use facebook or instagram or threads, in which case feel free to blacklist all Meta/FB domains and watch your ads disappear 😍; I'm jealous and in awe of you lol).
One note: some apps may behave unpredictably when they can't download ads. For example, the Tumblr app has big black spaces where the ads are, and sometimes those spaces collapse as you scroll past them and it messes up scrolling for a few seconds (UPDATE: looks like the scrolling issue may have actually been a Tumblr bug that they have now fixed, at least on iOS). Still way less annoying than getting ads for Draco Malfoy seduction roleplay AI chatbots imo though. And honestly *most* apps handle this fairly gracefully, like a mobile game I play just throws error messages like "ad is not ready" and then continues like normal.
One final note: on Android, you may actually be able to find hacked versions of Meta’s apps that have the ad frameworks removed. In some cases they are a little janky (unsurprisingly, apps don’t always take kindly to having some of their innards ripped out by a third-party), and they are often out of date. BUT in return you get an Instagram app with no ads whatsoever, and some of them even add additional features like buttons for saving IG videos and photos to your phone. However, use these apps at your own risk, as there is functionally no way to validate the code that the third-parties have added or removed from the app. Example altered IG app (I have not vetted this altered app, it's just a popular option): link.
It is technically possible to install altered apps on iOS as well, but Apple makes it much, much harder to do (unless you are jailbroken, which is a whole different ballgame). I'm not going to cover sideloading or jailbreaking here because even I as a very techy person eventually grew tired of messing with it or having to pay for it. If you're interested you can read more about the different ways to do sideloading on iOS here.
#adblockers#ad blocking#digital privacy#internet privacy#firefox#firefox extensions#mine#adguard#blokada#android#ios#iphone
513 notes
·
View notes
Text
how to connect to wi-fi services in pokemon gen 4 (DPPT/HGSS)
it's still possible to access the wi-fi services of the gen 4 games after the official shutdown of nintendo's wii/ds wi-fi in 2013 due to fan efforts by changing your DNS settings in-game - this is called the DNS exploit. this is popularly used in gen 5 which really has no complications, but in gen 4 it's a bit more complicated because the games are So old that they can't connect to the internet through modern routers due to fancy modern internet encryption. the connection either needs to have no password, or have WEP encryption, which most modern routers do not support. i had some people asking me how to do this so here's a post lol
first, it should be noted i use the pkmnclassic service, and i think you should too. this gives you access to old mystery gifts as well as pretty much every other wi-fi feature. their website also allows you to view pokemon currently uploaded to either gen 4 or 5's GTS through your browser. once you get your wi-fi set up properly, connecting to the internet will be easy, but that setup comes first. below i am going to list all the options i am currently aware of and able to explain
option 1 - phone hotspot (easy/convenient, doesn't work for every type of phone)
some phone hotspots are able to use old WEP type encryption, or be password-less. if you have access to a phone hotspot, it's worth taking off the password if it lets you and trying to connect to the gen 4 wi-fi with it before trying any other method, since if it works it's super convenient, just turn on the hotspot any time you want to do something online in gen 4 and turn it back off when you're done. unfortunately this depends on the type of phone and what OS its on and i don't have a list of what phones or OSes are compatible, so good luck lol. mine personally is not, and i have a fully updated iphone
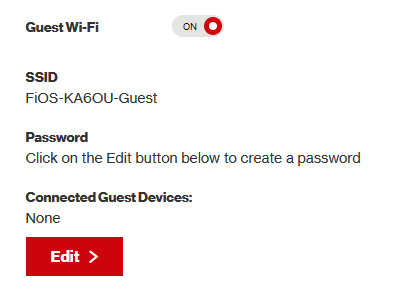
option 2 - guest wi-fi (a little less convenient but still easy if you have access to router settings)
in the same vein as phone hotspots, guest wi-fi hotspots can also work, and this is what i personally use myself. the catch is you have to have access to your router settings, so if you're a young person using a parents' router without access to those or some other situation like that, you may have to ask for assistance every time you want to turn this on/off, which could be a dealbreaker for some unfortunately. but if you're able to do that, simply make your guest wi-fi password-less and turn it on when you want to connect to gen 4 wi-fi and turn it back off when you're done. since these settings pages are so different per internet provider, i can't really give a guide on how to do that here, though mine through verizon fios is pretty straightforward. some guest wi-fi may not work for this but i think most should
option 3 - use an old router that supports WEP encryption (probably inaccessible for most, but only has to be set up once and then you're done)
i've done this in the past but i had my dad's help with the process, i cannot walk you through buying an old router lol. but yes if you purchase an old router and set that up you can have password protected gen 4 wi-fi permanently
option 4 - save backup + emulation through melonds (works pretty much 100% of the time if you have a hacked 3DS and some sort of PC)
MelonDS is a really great DS emulator that you can find here for windows/linux/mac: https://melonds.kuribo64.net/downloads.php
the basic idea is that you can backup your save file/game with a hacked 3DS using Checkpoint or TWLSaveTool (outside the scope of this guide but this is easy to do and you can walk through the steps here) and then run it through melonds, which can bypass all this WEP/encryption hell for you and simply connect to the internet. of course this is not very convenient if you have to constantly back up your saves to do wi-fi stuff but it's better than nothing if you have no other option.
unfortunately setting up the wi-fi can be a pain, and you also need DS BIOS files to run everything properly, which i cannot provide myself for legal reasons but they uh... aren't that hard to find lol, and you can back them up from an actual DS if you have access to the necessary tools for that.
if you use a windows PC, feel free to use my version of melonds which already has all the wifi shit set up, you'll just need to provide your own bios files under emu settings (it's a bit old but it works great for this purpose): https://drive.google.com/file/d/1DQotaqFuBwXz1KYdQWiwxghtn3faLgj-/view?usp=sharing
edit: just found out right after posting this that the most recent version of melonds might work out the box without having to do any particular wi-fi setup? so feel free to try it instead of my version if you like

if you are using linux/mac or don't want to use my version, you'll have to use the melonDS FAQ/google to figure it out, i'm sorry!
by the way yes, this means even if you don't have a gen 4 cart and solely play over emulator, you can trade/battle/etc with people who are playing on DS - they connect to the same servers!
okay and NOW once you have one of those options set up, you can actually connect to wi-fi in game by doing the following:
(these screencaps are from my capture card, i am doing this on an actual DS, but you can also do this with melonds if you're using that option)
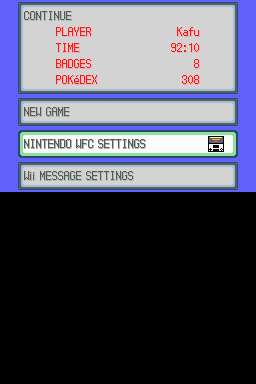
step 1: navigate to "NINTENDO WFC SETTINGS" in the menu where you press continue on your save file, in-game. in gen 4 you need to do it here and not in your DS settings.
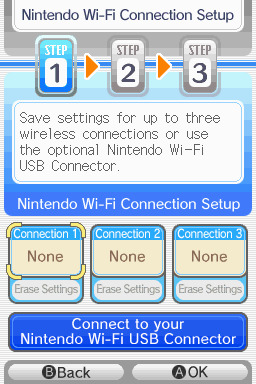
step 2: tap "Nintendo Wi-Fi Connection Settings" and pick any of the three connections here to start the set-up. if you already have some here, i'd click "erase settings" underneath to start from scratch.

step 3: search for an access point and pick your desired access point from the list that comes up, and put in a password if needed (this assumes you have set up your wifi properly at this point)
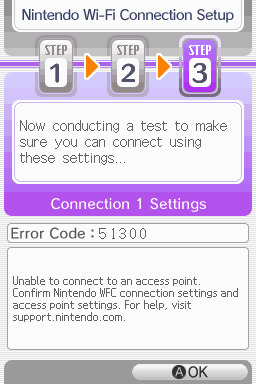
step 4: it will attempt a connection to the internet, and may or may not throw an error. regardless, the error doesn't really matter, you can just hit "OK" whether it's successful or not

step 5: go back into your new connection (the box that previously said "None" should now say "Ready") and scroll down until you see the option "Auto-obtain DNS" - change this to "No"
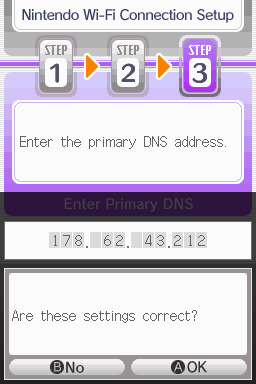
step 6: change the primary DNS to pkmnclassic's DNS, which is 178.62.43.212 - in layman's terms this will essentially let you connect to their servers instead of nintendo's, which are obviously down. as for the secondary DNS, either leave it at 0.0.0.0 or change it to the same DNS as the primary
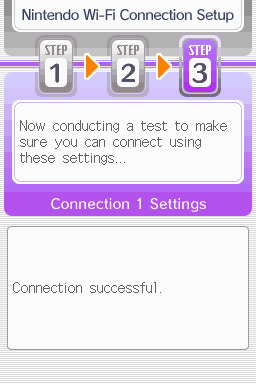
step 7: now would be a good time for a connection test. tap "Test Connection" in the top right. there should be a successful connection. assuming there is a successful connection, congrats! save your settings and enter your game as normal. you'll need to go to the basement of any pokemon center and pick up your pal pad, then try entering the wi-fi club (middle NPC at the counter) to test it in-game and get your friend code.
if there isn't, try a few more times or get closer to your access point - sometimes it's not you, the service can just occasionally be spotty. if you keep getting errors, you can use this site to look up what the error code might mean. if you still can't solve the issue, you may have to try a different method of connection as listed above.
sorry i couldn't be more in depth but frankly i'm not an expert on this stuff either, i'm just doing my best. there are a couple other options for doing this, like taking the password off your modern home wi-fi, or bridging your connection to an old laptop/computer, but the first is particularly dangerous so i didn't want to include it in the list and the second is completely out of my league, i just know people have done it before
good luck feel free to ask questions but no promises i'll have answers. if you need troubleshooting help i'd recommend pkmnclassic's discord over me, they have channels for that stuff (yes i hate troubleshooting stuff moving to discord and not forums as much as the rest of you but it can't be helped lol)
81 notes
·
View notes
Text
Excellent interaction at DND on Monday when I was telling my friends about DNS adguard and everyone wanted me to show them how to add it and someone was like "what does DNS stand for" and I'm like uh I mean I don't know, but GUESS WHAT I have a software engineer in the room who could immediately not only define the acronym but then launch into an explanation about how the Internet works. And then I was like I'm surprised you haven't put it on the house TV already and he was like oh I've never heard of it I use Linux. Peak Linux guy humour is guy who can explain why DNS adguard works and exactly what it's doing but has never heard of it before.
It took both of us like three straight minutes to figure out how to put it on his wife's phone because she has an iPhone
8 notes
·
View notes
Note
Blockda 5 doesn’t appear to exist for iPhones. Any advice?
Use NextDNS. Per the app's description, you also need to create a (free) online account, set up adblocking on it, then connect that to your app:
You can set your configuration ID from your NextDNS account in the Settings to bring your blocking policy to your phone and get Analytics and Logs about your traffic.
If you do not have a NextDNS account yet, you can create one for free at https://nextdns.io.
I may have made other posts about it as well, search my blog for "iphone"
12 notes
·
View notes
Note
hello nina, I'm a different anon and I bring more adblocking knowledge. you mentioned your phone; do you have an Android? if so, I have GREAT news for you: you can just go to your private DNS mode settings and type in "dns. adguard-dns. com" (remove the spaces) and it'll block most ads on your phone, including apps (not just browsers)! it doesn't work for everything - YouTube for example is notoriously difficult - but it works for most things in my experience. you can actually set this up on most devices, including tablets and computers, and even your router if you have access to the settings (username and password are usually either on it or just admin and admin). if you want more info on this, google Adguard private DNS and they themselves have deeper explanations and tutorials. Furthermore, for YouTube specifically, there are a few options, and i recommend looking it up on reddit if you want to read about all of them. however, I personally use and recommend revanced, which you can find instructions for on r/revancedapp; with it, you'll end up with YouTube but better, because you'll get more options for settings, as well as adblocking and even sponsor blocking (as in, it'll automatically skip sponsor sections in videos), while still being able to log in to your account and get your regular sub box and playlists and stuff. lastly, please use Firefox as your mobile browser, bc it's just better and also you can install ublock origin on it. have a nice, ad-free day!
i have an iphone and this message was eye opening regarding how much i cannot do in it. i really don't think i can even access the whole dns shebang (i'm not even sure what that means to be honest. can you tell i'm not tech savy at all?) and the revanced app isn't available here either. and dude, i'd kill for that sponsor blocking. i have it on my laptop, that and no ads are the sole reasons why i spend so much time on youtube
i did just download firefox for my phone though. i've been using safari mostly because it's fine for me, and the icon is pretty (dumbest reason, i know). now i'm off to do a LOT of googling because i don't even know how to install extensions there
update after a quick google search: firefox extensions are not available on ios i see how it is!!!
#and to think i was a linux user at some point... how things changed jesus#but thank you sm!#anon#i don't even blame them for not wanting to mess with extensions in ios have you seen apple's policies?? insane#nina's mail#💌
3 notes
·
View notes
Text

March variant of my calendar #wallpaper series is now available. Downloads available in Desktop 4K (with and without dates), Ultra widescreen, Tablet and Mobile sizes - https://www.kriegs.net/2025/02/march-2025/ Overlooking the Hudson Valley. Mohonk Preserve, NY Sony A7IV, Sigma 24-70mm DG DN II
#wallpaper#desktop wallpaper#photography#iphone wallpaper#android wallpaper#ipad wallpaper#calendar wallpaper#calendar#4k wallpaper#widescreen wallpaper#sigma 24 70mm dg dn ii#sony a7iv#sony alpha#mohonk preserve#new york#hudson valley
3 notes
·
View notes
Text
Cách vẫn truy cập vào Telegram không cần VPN
Gần đây, các rào cản kỹ thuật đã ảnh hưởng đến việc truy cập Telegram của người dùng Việt Nam, tạo ra những khó khăn không mong muốn cho cộng đồng sử dụng ứng dụng nhắn tin bảo mật này. Thay vì sử dụng các công cụ VPN thường gây tiêu hao pin và cấu hình rườm rà, bạn có thể áp dụng kỹ thuật proxy MTProto - một cách tiếp cận tối ưu và hiệu quả hơn rất nhiều.

Quy trình kết nối Telegram qua Proxy trong 3 bước
Bước đầu: Thiết lập DNS tùy chỉnh
Bắt đầu bằng việc tìm kiếm và cài đặt ứng dụng "1.1.1.1" trên cửa hàng ứng dụng của thiết bị (Google Play Store cho Android hoặc App Store cho iPhone). Sau khi hoàn tất cài đặt, hãy khởi chạy ứng dụng và kích hoạt tính năng DNS. Thao tác này sẽ thay thế DNS mặc định của nhà cung cấp dịch vụ internet, giúp bạn dễ dàng tiếp cận các nguồn cung cấp proxy.
Bước hai: Kết nối với máy chủ proxy chuyên dụng
Sử dụng trình duyệt web hoặc chức năng tìm kiếm của Telegram (nếu còn khả năng truy cập) để điều hướng đến địa chỉ: https://t.me/ProxyMTProto. Tại kênh này, bạn sẽ tìm thấy một loạt các máy chủ proxy khả dụng. Hãy lựa chọn bất kỳ proxy nào trong danh sách và click vào nút "Connect". Hệ thống sẽ tự động thực hiện quá trình cấu hình và thiết lập kết nối proxy cho ứng dụng.
Bước cuối: Hoàn thiện và sử dụng
Khi Telegram hiển thị thông báo kết nối thành công (thường xuất hiện biểu tượng bảo vệ ở phần đầu màn hình), bạn có thể thoát khỏi ứng dụng 1.1.1.1 và tắt nó đi. Lúc này, Telegram đã sẵn sàng hoạt động bình thường với đầy đủ chức năng nhắn tin và gọi điện.
Xử lý khi gặp vấn đề
Trong trường hợp tin nhắn phản hồi chậm hoặc xuất hiện lỗi kết nối, đây là hiện tượng bình thường. Giải pháp là quay trở lại kênh proxy (có thể cần kích hoạt lại 1.1.1.1 để truy cập) và thử nghiệm với các máy chủ proxy khác trong danh sách. Việc thay đổi proxy thường sẽ khắc phục được những khó khăn này.

Ưu điểm vượt trội của Proxy MTProto so với VPN
Tối ưu hóa hiệu suất thiết bị
Điểm khác biệt cốt lõi giữa proxy MTProto và VPN nằm ở cách thức xử lý dữ liệu. VPN thực hiện mã hóa toàn diện cho mọi hoạt động internet trên thiết bị, điều này đòi hỏi nhiều tài nguyên hệ thống và làm giảm thời lượng pin. Trái lại, proxy MTProto được thiết kế tập trung chỉ cho Telegram, giúp thiết bị hoạt động nhẹ nhàng và bảo tồn năng lượng pin hiệu quả.
Tăng cường tốc độ truyền tải
Nhờ không cần thực hiện quá trình mã hóa toàn bộ như VPN, proxy MTProto mang lại trải nghiệm sử dụng Telegram mượt mà hơn đáng kể. Mọi tác vụ từ gửi nhận tin nhắn, thực hiện cuộc gọi âm thanh đến tải xuống tài liệu đều diễn ra nhanh chóng và ít gián đoạn.
Đơn giản hóa quy trình triển khai
Khác với nhiều dịch vụ VPN đòi hỏi đăng ký tài khoản, thanh toán phí dịch vụ và cấu hình phức tạp, proxy MTProto có thể được thiết lập chỉ trong vài phút với những thao tác cơ bản. Đây là giải pháp hoàn toàn miễn phí, không yêu cầu đăng ký và cực kỳ thân thi���n với người dùng.
Kết luận
Nếu bạn đang tìm kiếm phương án hiệu quả để duy trì việc sử dụng Telegram tại Việt Nam mà không muốn ảnh hưởng đến hiệu suất thiết bị, proxy MTProto chính là lựa chọn lý tưởng. Giải pháp này kết hợp tính đơn giản, tốc độ và hiệu quả, mang lại trải nghiệm người dùng tuyệt vời mà không tốn kém bất kỳ chi phí nào.
0 notes
Text
Favorite iOS Safari Extensions
On iOS (iPhones and iPads), Safari is the undisputed leader of the browsers, primarily because Apple puts very tight restrictions on other browser apps that makes it very difficult for them to offer the same features that Safari does.
Thankfully, you can install extensions to tweak Safari's behavior and customize websites, as long as your device is running iOS 15 or higher. Here are the Safari Extensions I use on a daily basis. Many are free (or at least have a free version), and all work on both iPhones and iPads.
For desktop computers and Android phones, you can also check out my recommendations for Firefox addons)
Last updated March 2025 (fixed broken Bypass Paywalls Clean links, added StopTheMadness)
Index:
AdGuard
Noir
uBlacklist
Userscripts
Sink It for Reddit
UnTrap
Vinegar
StopTheMadness
AdGuard
This addon is free if you just want to use the built in adblocking lists. For a small yearly fee, you can pay for "Pro" features, which allows you to add any custom adblocking list to the app, as well as providing DNS-based system-level adblocking that can block ads and trackers inside any app on your phone. Note that it gives you two options for the system-level blocking, local VPN and native DNS; using the VPN option can drain your battery faster than normal in my experience, so I recommend using the native DNS instead. Between AdGuard and the two YouTube-customizing extensions below, I haven’t seen an ad on YouTube in Safari in months.
Recommended custom filter lists (in addition to the built-in default lists):
Bypass Paywalls Clean (you’ll also need to install this userscript using the Userscripts Safari extension mentioned later in this list for maximum paywall blocking)
Huge AI Blocklist (if you don’t want AI art or AI images of nonexistent chimera animals cluttering up your search results)
Fuck FuckAdblock
Noir
Adds a dark mode to any website. It's using heuristics (fancy guessing) to figure out which website colors need to be changed so that it's darkened, so sometimes it can make mistakes. In that case, it has a built in way to send a bug report to the developer, who is pretty responsive in my experience; he updates the app around once a month in my experience. You can also turn off darkening for specific sites right from inside Safari.
uBlacklist
This addon hides search engine results from specific domains. Example: you can hide images results from AI generator sites, OR if you search for tech support advice and one of those stupid auto-generated sites filled with SEO garbage but no actual information keeps popping up, you can use this addon to hide everything from that website, right from the Google/DuckDuckGo/other search results.
Recommended filter subscriptions:
Huge AI Blocklist
Userscripts
Allows you to install userscripts and stylesheets that customize website behavior or appearance. The addon can check for updates of your userscripts and uses iCloud to synchronize them across devices too, which is really nice. The userscripts I use are:
Bypass Paywalls Clean (removes news website paywalls)
Amazon Sponsored Products Removal (self-explanatory)
Redirect Fandom to BreezeWiki (bypasses ad-filled fandom.com domains for indie wikis or an ad-free proxy site. The link documents 2 userscripts with slightly different behavior; use whichever you prefer).
Sink It for Reddit
I switched to only using Reddit in the browser after the whole API/third party apps fiasco. AdGuard blocks the ads in the web interface, but there were still a lot of annoyances because Reddit constantly bombarded you with prompts/popups trying to get you to switch to their app so they could track you and sell you ads. Sink It for Reddit removes all of those popups and lets you customize the behavior of the Reddit website too (tapping a post can open it in a new tab, back to top buttons for long posts, and video downloads, among other things). Constantly being updated too, which is nice to see.
UnTrap (USD $1.99)
This extension cleans up the YouTube interface in the browser. You can hide Shorts, Explore, Trending, and multiple flavors of Suggestions (videos, playlists, etc.). It also stops autoplaying videos, and has a content filter you can use to ensure you never see certain channels or even specific videos by ID, username, or keyword/regex. There are over 50 options you can tweak for the video playback page alone, so if you’re looking to remove an annoyance from YouTube in Safari on iOS, this is the addon for you. Note however that this is the first extension I’ve recommended that does NOT have a free version.
Vinegar and Baking Soda (USD $1.99)
This extension replaces YouTube’s custom video player with a standard HTML5 one. This means that YT videos will play back using the standard iOS video player interface, including all of the accompanying benefits: better interface, Picture in Picture/popout videos work, videos continue playing in the background even if you leave Safari, etc.. I was even able to start a YouTube video in Safari, lock my phone, and then continue playing the video and hear the audio over my car’s speakers via CarPlay. These are all normally locked features reserved for YouTube Premium subscribers. You can also set a default quality that it will use so YouTube won’t use “auto” and set you to 360p just because you’re using a phone.
StopTheMadness Pro (USD $14.99)
This app is really only for techies who use mobile websites a LOT; for me the very high price tag is worth it primarily to stop the following web annoyances:
Stops websites from disabling features like copy and paste, pinch to zoom, context menus, or text replacement/autofill
Adds a warning when you’re exceeding the length of a password field (too many poorly coded websites just chopping off the extra characters without telling me and then the password I recorded is wrong)
Stops autoplaying video (looking at you, YouTube and news websites)
I’ll be honest, this app has a LOT of features and the number of options can be overwhelming. It has dozens of things I did not mention, and some of them even overlap with other items in this list. For example, if you have this you probably don’t need Baking Soda or Vinegar because this app has options for enabling native Safari controls on all videos, setting default YouTube quality and subtitles, etc.
6 notes
·
View notes
Text
All of this is true...and I have a 6-step solution for folks who have an android device and are sick and fucking tired of being harassed by predatory advertising. (This will not stop the videos-that-are-actually-ads situation...but it will stop the onslaught in game apps.)
ONE!
Open your settings and search for "DNS."
TWO!
Tap on "Private DNS." (You might have to tap multiple levels of DNS or Private DNS headers- I have to do it twice on my phone).
THREE!
Tap the "Private DNS provider hostname" radio button. (That's what it's called on Samsung devices; it may be called something else on other Android devices. Whatever it's titled, it's the option that lets you type something into a box immediately below it.)
FOUR!
Type this into the box provided:
dns.adguard.com
FIVE!
Press Save (or submit, or whatever the "finalize this decision" button is for your phone's specific version of android OS).
SIX!
Close any game apps you have open, and reopen the one you want to play. (You must do this and I don't know why. Maybe someone reading this does know, and could share with the class?)
RESULT:
Auto play ads in game apps will completely fuck off into nonexistence until you turn DNS back to "off" or "default", but the game itself will continue to work just fine.
Issues to be aware of: You won't be able to get ad-spawned "rewards" in games. If you try it will simply tell you the request was denied, you don't have internet, the ad wasn't ready, or a host of similar "that didn't work" kind of messages. If you want to get those "rewards" for some reason, you can follow the directions above but change DNS to "Off" or "Default." Restart your app and ka-bam, assaulted by ads once more.
You will also quickly realize exactly how MANY games for our phones are literally nothing more than ad revenue farms because when you take the time-consuming frustration (or "watch to win" opportunity) of ads away...a huge chunk of the games in the app store become boring, repetitive, unplayable, or all three within a matter of minutes. It's genuinely insane how much they're fleecing us and how we tend to just...accept it as normal. Gross.
You will not be able to connect to the internet through a location-locked Wi-Fi network (such as K-12 schools or government buildings). That part does kind of suck, but it takes two seconds to change the DNS settings...or you can just use mobile data.
It doesn't work on YouTube, unfortunately. BUT! You know what DOES work? uBlock Origin on Firefox for mobile. (Yes, I totally get the irony of recommending a product in an anti-ad post. All I can say is...at least they're free, and they actually do what they say they're doing.) Anyway. Get the Firefox app and install the uBlock origin extension. Visit YouTube using Firefox and voila, no more ads. YouTube will try to open the app every. single. damn. time. you copy a URL into the address bar...but you can close the app and go back to Firefox and it will play just fine.
It only partially works on Tumblr, but the Firefox trick works with our dumpster fire webbed site as well.
"But I use an iPhone...?"
Unfortunately, I can't help you. I don't know how, or even if, it is possible to set up private DNS on an iPhone, or whether it works the same way. If it does? Please reblog and let me know!
Something so profoundly fucked up between the inverse ratio of shrinking middle class and ever increasing aggression of advertisement
103K notes
·
View notes
Text
Wifi từ chối quyền truy cập - Nguyên nhân & cách khắc phục
Lỗi WiFi từ chối quyền truy cập khiến thiết bị không thể kết nối mạng dù mạng vẫn hoạt động. Bài viết này sẽ phân tích nguyên nhân và hướng dẫn cách khắc phục hiệu quả.

WiFi từ chối quyền truy cập là gì?
Đây là tình trạng thiết bị (laptop, điện thoại) không thể kết nối WiFi do router hoặc hệ thống mạng chặn, thường kèm thông báo như "Incorrect password" hoặc "Access denied".
Nguyên nhân WiFi từ chối quyền truy cập
Lỗi này có thể xuất phát từ:
Lỗi thiết bị kết nối: Sai mật khẩu, card WiFi tắt, lỗi phần mềm, hoặc không hỗ trợ chuẩn mã hóa.
Lỗi bộ phát WiFi: Router quá tải, cấu hình DHCP sai, hoặc firmware lỗi thời.
Chặn địa chỉ MAC: Router giới hạn thiết bị theo địa chỉ MAC.
Xung đột IP: Hai thiết bị dùng chung IP hoặc IP bị giới hạn.
Cấu hình DNS sai: DNS không phản hồi hoặc proxy/VPN lỗi.
Virus/phần mềm độc hại: Can thiệp cài đặt mạng, chặn kết nối.
Cách khắc phục
Dưới đây là các bước khắc phục lỗi WiFi từ chối quyền truy cập:
1. Khởi động lại thiết bị và router
Tắt thiết bị và router trong 30 giây, bật lại, đợi 2-3 phút rồi thử kết nối.
2. Kiểm tra chức năng WiFi
Trên điện thoại: Vào Cài đặt > WiFi, đảm bảo WiFi được bật.
Trên Windows: Nhấn Windows + A, bật WiFi nếu tắt.
Trên macOS: Bật WiFi qua biểu tượng trên thanh menu.
3. Đặt lại IP tĩnh
Nhấn Windows + R, nhập ncpa.cpl, chọn WiFi > Properties.
Chọn Internet Protocol Version 4 > Properties, nhập:
IP address: 192.168.1.x (x từ 2-254).
Subnet mask: 255.255.255.0.
Default gateway: 192.168.1.1.
Nhấn OK và thử kết nối lại.
4. Cài đặt lại driver WiFi
Nhấn Windows + X > Device Manager > Network Adapters.
Chuột phải WiFi Adapter, chọn Update driver. Nếu không hiệu quả, chọn Uninstall device, khởi động lại máy.
5. Quét virus
Sử dụng Windows Defender (Windows) hoặc Avast/Bitdefender (điện thoại) để quét và loại bỏ virus/phần mềm độc hại.
6. Kiểm tra và reset router
Kiểm tra đèn tín hiệu router. Nếu nhấp nháy bất thường, tắt 30 giây, bật lại.
Nếu vẫn lỗi, nhấn nút Reset trên router 10-15 giây, sau đó cấu hình lại WiFi.
7. Xóa cache mạng
Android: Vào Cài đặt > Ứng dụng > WiFi, xóa cache/dữ liệu.
iPhone: Vào Cài đặt > Cài đặt chung > Đặt lại cài đặt mạng.
Windows: Chạy Command Prompt (Admin), nhập lệnh: netsh winsock reset, netsh int ip reset, ipconfig /release, ipconfig /renew, ipconfig /flushdns.
Lưu ý
Thử kết nối với mạng khác để xác định lỗi từ thiết bị hay router.
Sao lưu dữ liệu trước khi reset thiết bị.
Tránh chia sẻ mật khẩu WiFi để giảm tải mạng.
Liên hệ nhà cung cấp Internet hoặc VoHoang.vn nếu lỗi kéo dài.
Với các bước trên, bạn có thể tự khắc phục lỗi WiFi từ chối quyền truy cập tại nhà.
1 note
·
View note
Text
Ethereum Just Quietly Solved One of Its Biggest Problems—and It’s Not About TPS
Ethereum didn’t launch a flashy new Layer 2. It didn’t roll out another zkVM or announce a billion-dollar fund. But this week, something far more fundamental happened—Ethereum quietly took a massive leap toward becoming the true backbone of a multichain internet.
The ERC-7828 and ERC-7930 proposals aren’t sexy. They don’t come with bull-market hype or token airdrops. But they do solve a usability nightmare that’s been plaguing Ethereum and its Layer 2 ecosystem for years: the chaos of cross-chain addresses.
If these proposals are finalized as planned next week, it will mark a rare moment in crypto—when something actually gets simpler.
The Multichain Mess No One Talks About
Today, Ethereum isn't a single chain. It’s a constellation of rollups, appchains, and sidechains—Optimism, Arbitrum, Base, zkSync, Linea, and more. They all inherit Ethereum’s security, but their user interfaces? Pure fragmentation.
Sending tokens between these chains is like navigating a minefield. Same address on multiple chains? Easy to get confused. Accidentally send ETH to your Arbitrum address on zkSync? You might never see it again. Wallets require constant network switching. DApps often can’t tell what chain you’re on. Block explorers disagree on what your address even is.
It’s a disjointed experience that undermines everything Ethereum stands for.
One Name to Rule Them All
Enter ERC-7828 and ERC-7930.
ERC-7930 is the machine layer. It defines a compact, binary format for interoperable addresses—something protocols and APIs can parse consistently. It’s the “backend” fix.
ERC-7828, meanwhile, is the human layer. It introduces a simple, readable address format like vitalik@optimism or readonly@base. Wallets can now know, and show, exactly which chain you're talking about—without requiring the user to fiddle with network settings.
To put it bluntly: these two standards could finally allow Ethereum users to send assets across chains without thinking about chains. That’s a user experience win so overdue, it’s almost embarrassing.
Why This Matters More Than TPS
Crypto debates are obsessed with throughput—transactions per second, finality time, block size, etc. But the truth is, throughput doesn’t matter if the UX is broken.
What we’ve lacked isn’t faster chains—it’s composable simplicity.
With these standards, Ethereum wallets and DApps can operate like Apple’s AirDrop. Type a name, hit send, and the system figures out the plumbing behind the scenes.
Remember, the iPhone didn’t win because of its specs—it won because it “just worked.” This is Ethereum’s shot at doing the same for multichain interaction.
The Hidden Genius: It's Not Just for People
While ERC-7828 cleans up the user interface, ERC-7930 opens up a new world for protocols and smart contracts.
With a standard binary format for address+chain combos, bots, bridges, and contracts can interoperate without needing bespoke code for every new rollup. It’s like assigning every chain a ZIP code—and making sure everyone uses it.
Think of how much developer time gets wasted today on bridge integrations, address validation hacks, or custom network resolvers. This fixes that.
Isn’t This Just Cosmetic?
At first glance, yes. Critics might argue this is just a naming convention—a UX band-aid over a deeper fragmentation problem.
But that’s short-sighted.
Standards are infrastructure. They’re what makes the internet work. Without TCP/IP, you’d have a hundred incompatible networks. Without DNS, you’d be typing IP addresses into your browser.
ERC-7828/7930 are Ethereum’s version of DNS + TCP/IP for the multichain world. They don't just make life easier for users; they unlock a smoother, interoperable base layer for apps, wallets, and infra teams. That’s leverage.
This Isn’t Just About Ethereum—It’s About Winning the War for the Interface
Let’s zoom out. Why does this matter?
Because the battle for crypto’s next 100 million users won’t be won on tech specs—it’ll be won on default experience.
Right now, centralized exchanges like Coinbase or Binance offer smoother, simpler interfaces. Want to send money from one chain to another? They handle it invisibly. DeFi can’t compete—yet.
But with ERC-7828 and ERC-7930, Ethereum is laying the groundwork for self-custodial wallets to catch up. Imagine MetaMask or Rainbow resolving alice@linea or joe@zksync with zero clicks. Add bridging, gas abstraction, and one-click swaps—and you suddenly have something that can rival centralized platforms without sacrificing decentralization.
The Long Game: What This Unlocks
Here’s the bullish case:
Better UX → More Users
Reduces onboarding friction for newbies.
Reduces error risk for pros.
Standardization → Better Composability
Bridges, rollups, and dApps can speak the same language.
Developers stop reinventing the wheel for each new chain.
Composability → Liquidity Flywheel
Easier UX pulls in more transactions.
More usage drives more fees and validator rewards.
Ethereum L2s get stickier, not more fragmented.
All of this supports a future where Ethereum isn’t just a platform, but the standard settlement layer for the internet of value.
This Becomes the New Default
If finalization proceeds on schedule by May 9, expect wallets and explorers to integrate this fast. Once users get a taste of “send money to vitalik@base,” they won’t go back.
It will start as a developer feature. Then become a power-user feature. Then suddenly, it’s table stakes. Protocols that don’t support this format will look outdated.
And just like that, Ethereum will have made multichain interaction feel like Web2—without giving up Web3 values.
Bottom Line
While everyone’s been distracted by memecoins and modular chains, Ethereum just fixed one of its most annoying—and important—UX failures.
It didn’t require a Layer 1 fork or a Layer 2 acquisition. Just a little standardization. Just two clean ERCs.
Sometimes the most powerful innovations aren’t technical moonshots—they’re the quiet decisions that make things just work.
Don’t overlook this one.
If this piece gave you a fresh angle, helped you think deeper, or just saved you from a future cross-chain screwup, consider supporting our work.
We don’t run ads. We don’t sell subscriptions.
But you can buy us a coffee here—and help us keep writing bold, data-backed takes for free.
© 2025 InSequel Digital. ALL RIGHTS RESERVED. No part of this publication may be reproduced, distributed, or transmitted in any form without prior written permission. The content is provided for informational purposes only and does not constitute legal, tax, investment, financial, or other professional advice.
0 notes
Text
Why Hotel Prices Change — and How to Unlock Cheaper Rates Instantly
Ever notice how hotel prices seem to go up the more you search?
One minute it’s $89 a night, the next day it’s $124 for the same room — same site, same dates.
That’s not your imagination. Hotel pricing is dynamic — and it’s heavily influenced by your location, device, and even search history.
The good news? You can flip that system and get cheaper hotel rates instantly using a simple trick: a VPN.
🏨 How Hotel Booking Sites Adjust Prices
Platforms like Booking.com, Expedia, Hotels.com, Agoda, and others use advanced tracking to determine how much to charge you.
They check:
Your IP address (to guess your country, income level, demand)
Your cookies (to see if you’ve searched for the same dates multiple times)
The device you’re using (iPhones get higher prices than Android in many tests)
Time of day, browser, and even past behavior
This is how they squeeze more out of every user.
🧠 The VPN Trick That Works
A VPN (Virtual Private Network) allows you to change your visible location. So instead of appearing like you’re in the U.S. or UK, you can show up as if you’re in:
India
Mexico
Philippines
Thailand
Turkey
Brazil
These countries often get local pricing, even on global platforms — and the difference can be huge.
💰 Real Price Differences I’ve Seen
Using a VPN and switching locations, I’ve saved:
$62 on a 3-night stay in NYC
$145 on a resort in Cancun
$80 on a 5-star hotel in London
$35 on a 1-night stopover hotel in Tokyo
18% average discount across 6 bookings on Booking.com
Same rooms. Same platform. Just viewed from a different IP.
✈️ Step-by-Step: How to Do It
Install a good VPN
Connect to a cheaper region (e.g. Mexico, India, Brazil)
Open a new incognito window in your browser
Visit the hotel booking site
Search the same dates, same location
Compare results vs your normal IP
If the price is lower — book it. Simple.
⚠️ Not All VPNs Work for This
To avoid getting blocked or flagged, your VPN should:
Have stable, fast servers in multiple countries
Not leak DNS/IP info
Work well with incognito mode and browser tracking
Avoid detection by Booking.com and Expedia’s filters
I’ve used this one for nearly every hotel booking I’ve made in the past year: https://vpnscouter.com/vpn-for-cheaper-hotels.php
It works perfectly with all major booking platforms.
🧾 Bonus: Use VPN + Clear Cookies = Max Savings
Booking sites store your searches. If you check the same room 3–4 times, they may bump the price, thinking you’re desperate to book.
Always:
Clear cookies before each new search
Use incognito/private mode
Refresh after switching VPN locations
✅ Final Thoughts
Hotels use location-based pricing against you. But now you know how to flip that.
Whether you’re booking for vacation, business, or a stopover, always run your search through a VPN first.
It takes 20 seconds and can save you hundreds.
Here’s the one I personally recommend: https://vpnscouter.com/vpn-for-cheaper-hotels.php
Book smarter. Spend less. Sleep better.
0 notes
Text
For anyone looking to minimize their ads on iPhone (because saying “just get android” is not an actual answer for some people)
AdGuard DNS can be installed directly into your phone so all your traffic is routed through there. Blocks ads on web and all your apps like mail apps etc. Does not block YouTube ads.
if you want to block video ads, the best way I’ve found is to use Brave and YouTube web.
To install AdGuard DNS:
Go to the link above IN SAFARI BROWSER ONLY (it doesn’t install if you use Firefox) and scroll down to option 2
you do NOT need to install their app
under option 2 open the Apple toggle
Download the link it sends you it will pop up “do you want to install profile” hit yes
switch to Settings, New Profile Added should be right at the top
install that sucker
enjoy your minimal ads experience 😊
i hate seeing people now making fun of those who care about privacy online. i've seen people saying things like "well they already have your data. what are companies going to do with it" and it's like, that's not the point. it's that companies /shouldn't/ be able to have my data and sell it. am i aware they probably already have my data? yes, absolutely. but i'm still going to try and keep them from monetizing it any further, why are we defending companies selling data they shouldn't have to begin with though?
#Got a new iPad recently and this was the FIRST thing I did#for the “get an android” crew: no 🙃 I do not have time to learn a new system when my work is sooo phone connected. Plus. New phone cost $#This is what works best for me and a lot of other people and we should be able to minimize ads as much as possible anywhere
71K notes
·
View notes
Text
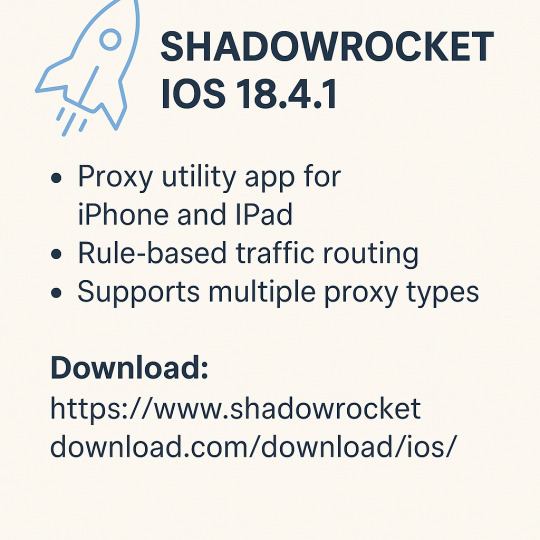
Shadowrocket iOS 18.4.1
Shadowrocket iOS 18.4.1 is the top choice for anyone looking to browse the internet privately and securely on an iPhone or iPad. It’s a smart app that helps you block ads, bypass internet restrictions, and keep your data safe. With support for iOS 18.4.1, it now works better than ever.
This app is built for users who care about online privacy and want full control over how their apps use the internet. This guide’ll explore everything you need to know about Shadowrocket iOS 18.4.1, including features, setup, and why so many iOS users rely on it daily.
What is Shadowrocket?
Shadowrocket is an open-source rule-based proxy app made for iOS. It uses advanced encryption protocols to protect your connection and allows you to browse any website or use any app without limitations.
With Shadowrocket iOS 18.4.1, you can:
Use proxy servers to hide your IP
Access restricted websites and services
Block unwanted ads and trackers
Monitor app traffic in real-time
It’s more than just a VPN. It gives you fine-tuned control over your device’s network activity.
Why Shadowrocket iOS 18.4.1 is Better Than Ever
The latest update to Shadowrocket iOS 18.4.1 brings major improvements for iPhone users:
Full support for iOS 18.4.1
Faster connection and lower battery usage
New user interface tweaks for easier navigation
Improved rule handling for better filtering
More stable performance across all iPhone models
These changes make it one of the most stable and feature-rich privacy apps for Apple devices.
Download Shadowrocket iOS 18.4.1
You can easily get Shadowrocket iOS 18.4.1 from the official source. It’s a fast and safe download, and no jailbreak is required.
Download now from: https://www.shadowrocketdownload.com/download/ios/
Just follow the instructions on the site to install it directly to your iPhone or iPad.
Features of Shadowrocket iOS 18.4.1
1. Encrypted Connections
At its core, Shadowrocket iOS 18.4.1 uses encryption protocols like Shadowsocks to protect your internet traffic. That means your data stays private, even on public Wi-Fi.
2. Rule-Based Proxy Setup
You can set detailed rules to choose how each app or website connects. For example, you can route social media through a proxy but let your banking app use a direct connection.
3. Real-Time Network Monitoring
Want to see what data your apps are using? Shadowrocket shows live traffic logs so you can spot anything unusual.
4. Built-in Ad and Tracker Blocker
Shadowrocket iOS 18.4.1 has built-in filtering tools to block popups, banner ads, and trackers across all apps and websites.
5. Flexible DNS Settings
It supports DNS over HTTPS and DNS over TLS, giving you better privacy and helping websites load faster.
How to Set Up Shadowrocket iOS 18.4.1
Setting up Shadowrocket iOS 18.4.1 is simple:
Install the app from the official site.
Open Shadowrocket and import a proxy configuration (you can add this manually or scan a QR code).
Set your rules for how you want traffic to be filtered.
Turn it on and enjoy private, fast browsing!
You can also choose to allow or deny certain apps, making sure only the ones you trust are using the internet freely.
Why Use Shadowrocket iOS 18.4.1?
Here are the main reasons users love this app:
Privacy: Your internet activity is encrypted and hidden from ISPs, hackers, or trackers.
Speed: Even with proxies, the app is lightweight and doesn’t slow you down.
Freedom: Access apps, videos, and websites blocked in your region.
No jailbreak needed: Works right out of the box on iOS 18.4.1 without hacking your device.
Whether browsing, streaming, or working remotely, Shadowrocket iOS 18.4.1 keeps your connection safe.
Who Should Use Shadowrocket iOS 18.4.1?
This app is perfect for:
Travelers who want to access their home content abroad
Students who want to use restricted websites at school
Remote workers who need a secure connection
Privacy-conscious users who want full control over their data
If you use your iPhone for sensitive tasks or just want a cleaner, ad-free internet, Shadowrocket iOS 18.4.1 is the right tool for you.
Advanced Options in Shadowrocket iOS 18.4.1
While it’s simple for beginners, advanced users can enjoy deeper features:
Custom rule creation (domain-based, IP-based, or geographic)
Auto proxy switching depending on speed or failure
Import/export of configuration files
Support for multiple proxy types: Shadowsocks, Vmess, Trojan, and more
It offers power and flexibility that most VPN apps simply don’t.
Is Shadowrocket iOS 18.4.1 Safe?
Yes, Shadowrocket iOS 18.4.1 is safe to use—especially when downloaded from the official website. It doesn’t collect your personal information, and since it’s open-source, it’s trusted by a large community of users and developers.
Just be careful when choosing proxy servers. Always use reliable and secure sources to avoid data leaks or slow speeds.
Shadowrocket iOS 18.4.1 for Streaming and Gaming
If you enjoy streaming or online gaming, Shadowrocket iOS 18.4.1 can give you a smoother experience. Connecting to a proxy near your game server or streaming service reduces lag and buffering.
Many users use it to unblock:
Netflix
YouTube
Spotify
Disney+
Online games with regional limits
Just configure your rules, and you’re good to go!
Common Issues and Fixes
Here are a few things users might run into when using Shadowrocket iOS 18.4.1:
App won’t install: Make sure you're using a trusted source and your iPhone is updated to iOS 18.4.1.
Proxy not working: Double-check the server details. Some public proxies may be offline.
App crashes: Reboot your phone and reinstall the app if needed.
Most problems can be fixed easily by restarting the app or checking your configuration.
Final Thoughts
Shadowrocket iOS 18.4.1 is more than just a proxy app. It’s a full privacy solution that puts you in charge of your iPhone’s internet traffic. Whether you’re looking to hide your activity, access restricted content, or block annoying ads, this app has the tools.
It’s easy to install, works with iOS 18.4.1, and gives you full control without jailbreak. If you haven’t tried it yet, this is the best time.
You can download Shadowrocket iOS 18.4.1 from: https://www.shadowrocketdownload.com/download/ios/
Take control of your privacy today—secure, fast, and completely free.
0 notes
Photo

Hikvision ColorVu IP Bullet D/N IR 4 MP 4mm Hikvision ColorVu technology provides 24/7 vivid colorful images with F1.0 advanced lenses, high-performance sensors, and friendly lighting. F1.0 super-aperture collects more light to produce brighter images. Advanced sensor technology can vastly improve the utilization of available light. In zero-light scenarios, built-in, warm supplemental lighting works to guarantee colorful images. Features: Full time color Max. 2688 × 1520 @30fps 4mm fixed lens H.265+, H.264+ 120dB WDR IP67 12 VDC & PoE (802.3af, class 3) Built-in micro-SD/SDHC/SDXC slot, up to 128G BLC/3D DNR/HLC/ROI 0.0014 Lux @ (F1.0, AGC ON), 0 Lux with Light Specifications: Standard: TCP/IP Sensor: 1/1.8 " Progressive Scan CMOS Sensor: 1/1.8 " Progressive Scan CMOS Matrix size: 4 Mpx Resolution: 2688 x 1520 - 4 Mpx 2560 x 1440 - 3.7 Mpx 2304 x 1296 - 3 Mpx 1920 x 1080 - 1080p 1280 x 720 - 720p Lens: 4.0 mm View angle: 94 ° Compression: H.265+ / H.265 / H.264+ / H.264 / MJPEG White light LED illuminator range: 30 m Alarm inputs / outputs: Audio: Memory card slot: Micro SD memory cards up to 128GB support (possible local recording) Bitrate: 32 ... 16384 kbps Mainstream frame rate: 25 fps @ 4 Mpx Network interface: 10/100 Base-T (RJ-45) Network protocols: TCP/IP, ICMP, HTTP, HTTPS, FTP, DHCP, DNS, DDNS, RTP, RTSP, RTCP, PPPoE, NTP, UPnP, SMTP, SNMP, IGMP, IEEE 802.1x, QoS, IPv6, UDP, Bonjour WEB Server: Built-in, NVR compliance Max. number of on-line users: 6 ONVIF: 16.12 Mobile phones support: Port no.: 8000 or access by a cloud (P2P) Android: Free application iVMS-4500 or Hik-Connect iOS (iPhone): Free application iVMS-4500 or Hik-Connect Default admin user / password: admin / - Default IP address: 192.168.1.64 Web browser access ports: 80 PC client access ports: Port no.: 8000 or access by a cloud (P2P) - iVMS-4200 application Mobile client access ports: 8000 Port ONVIF: 80 RTSP URL: Mainstream rtsp://user:[email protected]:554/Streaming/Channels/101/ Sub stream rtsp://user:[email protected]:554/Streaming/Channels/102/ RS-485 interface: Main features: WDR - 120 dB - Wide Dynamic Range 3D-DNR - Digital Noise Reduction ROI - improve the quality of selected parts of image ANR - Automatic Network Replenishment allows to save image to the card when the network connection with DVR is break (network failure) and next synchronize its BLC/HLC - Back Light / High Light Compensation Possibility to change the resolution, quality and bit rate Configurable Privacy Zones Motion Detection Sharpness - sharper image outlines Possibility to turn off the LED illuminator Intelligent Image Analysis: intrusion, crossing the line (tripwire), abandoned/missing object, scene changing, face detection Power supply: PoE (802.3at), 12 V DC / 0.79 A Power consumption: ≤ 11 W @ PoE (802.3af) ≤ 9.5 W @ 12 V DC Housing: Compact, Aluminum Color: White "Index of Protection": IP67 Weight: 1.24 kg Dimensions: Ø 105 x 290 mm Operation temp: -30 °C ... 60 °C Supported languages: Polish, English, Bulgarian, Croatian, Czech, Danish, Estonian, Finnish, French, Greek, Spanish, Dutch, Lithuanian, Latvian, German, Norwegian, Portuguese, Russian, Romanian, Serbian, Slovak, Slovenian, Swedish, Turkish, Hungarian, Italian
#ELECTRONICS#HOME_SECURITY#CCTV_CAMERA#BULLET_CAMERA#CCTV#COLORVU#DS_2CD2T47G1_L_4.0MM#HIKVISION#IP_CAMERA#SECURITY_CAMERA
0 notes